지금까지는 주로 spring-restdocs 를 이용해 API 를 문서화 했습니다. spring-restdocs 를 사용한 이유는 아래와 같은 이유로 사용을 했습니다.
- 테스트 코드를 기반으로 작성, 테스트를 통과해야 문서를 만들 수 있으니 문서에 신뢰성이 생깁니다
- 프로덕션 코드에 문서화를 위한 코드를 추가할 필요가 없습니다
- Swagger 는 문서화를 위한 코드를 추가해줘야 합니다
이러한 이유로 restdocs 를 사용했지만 문제가 있었습니다. 바로 문서를 보기 싫다는것! (제 기준으로는...ㅎㅎ) 기껏 신경써서 문서를 만들었지만 화면에 보이는 것은 칙칙한 API 문서… 조치가 필요했습니다. 그래서 Swagger 사용을 고려해봤으나 코드에 api 문서 관련 코드를 넣고 싶지 않아 사용하지 않았습니다. 자료를 찾아보니 테스트 코드를 기반으로 문서화를 하지만 문서는 Swagger 형식으로 이쁘게 출력할 수 있는 방법이 존재했습니다.
바로 OAS(OpenAPI Spec) 을 사용하는 것 입니다. 테스트 코드를 기반으로 API Spec 을 JSON 이나 YAML 파일로 표현하고, 해당 파일을 Swagger 형식으로 출력하는 방법입니다. 회사 프로젝트가 maven 을 사용하기 때문에 maven 빌드 툴에서 어떻게 문서화를 했는지 보겠습니다. (구글링을 하면 gradle 빌드 툴을 사용한 예제 많이 나옵니다. )
개발환경
- JDK 17
- 인텔리제이
- Spring Boot 2.7.9
의존성 추가
API 문서를 만들기 위해서 pom.xml에 아래 의존성을 추가해줘야 합니다.
<dependency>
    <groupId>org.springframework.restdocs</groupId>
    <artifactId>spring-restdocs-restassured</artifactId>
    <scope>test</scope>
</dependency>
<dependency>
		<groupId>com.epages</groupId>
		<artifactId>restdocs-api-spec</artifactId>
		<version>0.16.4</version>
		<scope>test</scope>
</dependency>
<dependency>
    <groupId>com.epages</groupId>
    <artifactId>restdocs-api-spec-restassured</artifactId>
		<version>0.16.4</version>
    <scope>test</scope>
</dependency>
코드 작성
샘플용 API 추가
의존성을 추가하고 문서로 만들 샘플용 API 를 만들었습니다.
@PostMapping("/intsvc/homepage/payment_kakaopay/v1/payment")
public ApiResponse<?> paymentRequest(@RequestBody PaymentRequest req) {
    return ApiResponse.of(KakaopayApiCode.SUCCESS.getCode(), "정상적으로 처리하였습니다.", service.paymentRequest(req));
}
간단한 설명을 드리면 paymentRequest 는 kakaopay 결제를 요청하는 API 이고, 아래 3개의 API 는 고객이 카카오페이에 결제수단을 등록하고 나면 실행되는 결제 승인,취소,실패를 처리하는 API 입니다. 우선 첫번째 API 로 테스트 코드를 만들어 실행해보겠습니다. 테스트 코드 전체를 보시려면 하단의 git 주소로 가서 보시면 됩니다.
테스트 코드 작성
우선 테스트 코드에 어노테이션을 추가해줘야 합니다
@ActiveProfiles("test")
@SpringBootTest(webEnvironment = SpringBootTest.WebEnvironment.RANDOM_PORT)
@ExtendWith({RestDocumentationExtension.class})
public class PaymentRequestApiDocs {
@WebMvcTest 를 사용해도 컨트롤러 영역의 테스트, 문서화를 할 수 있다고 합니다.
@DisplayName("결제요청 API")
@Test
void success() {
    카카오결제준비API요청Mock("payment-request.json"); // (1)

    ExtractableResponse response = 결제요청(); // (2)

    String rescd = response.jsonPath().getObject("rescd", String.class); // (3)
    assertThat(rescd).isEqualTo("00");
    PaymentResponse resultInfo = response.jsonPath().getObject("resultInfo", PaymentResponse.class);
    assertThat(resultInfo.pcUrl()).isEqualTo("<https://online-pay.kakao.com/mockup/v1/69137840d93f62a9738b03b0fd000ab914302e894b0d9c59ae3a2a6702c2d33f/info>");
}
API 요청에 필요한 객체를 만들고, API 요청을 하고, 응답이 예상했던 값과 일치하는지 비교하는 코드 입니다. 먼저 문서화와는 무관하지만 테스트 코드 부분을 설명 드리겠습니다.
- (1) : 결제를 요청하기 위해선 카카오페이 결제준비API 를 호출해야 합니다. 하지만 테스트 코드에서는 실제로 카카오페이의 결제준비 API 를 호출할 필요는 없습니다. 외부환경에 의존하지 않는 테스트 코드를 만들기 위해서 Wiremock 을 사용해서 api 호출을 대체했습니다.
- (2) : 결제요청 API를 호출하는 메서드 입니다. 또한 문서 작성용 코드가 포함 되어 있습니다.
- (3) : API 응답 결과와 예상했던 값이 일치하는지 비교하는 코드 입니다.
이제 문서화 하는 코드가 있는 (2) 메서드를 확인해봅시다.
private Snippet REQUEST_FIELDS = requestFields(
        fieldWithPath("orderId").type(JsonFieldType.NUMBER).description("주문번호"),
        fieldWithPath("userId").type(JsonFieldType.NUMBER).description("회원ID"),
        fieldWithPath("productName").type(JsonFieldType.STRING).description("상품이름"),
        fieldWithPath("quantity").type(JsonFieldType.NUMBER).description("수량"),
        fieldWithPath("amount").type(JsonFieldType.NUMBER).description("결제금액"),
        fieldWithPath("paymentMethodType").type(JsonFieldType.STRING).description("결제수단(MONEY,CARD)"),
        fieldWithPath("installMonth").type(JsonFieldType.NUMBER).description("할부개월"),
        fieldWithPath("taxFreeAmount").type(JsonFieldType.NUMBER).optional().description("비과세금액")
        );

private Snippet RESPONSE_FIELDS = responseFields(apiResponseFields())
        .andWithPrefix("resultInfo.",
                fieldWithPath("payId").type(JsonFieldType.NUMBER).description("결제ID"),
                fieldWithPath("tid").type(JsonFieldType.STRING).description("결제고유번호"),
                fieldWithPath("orderId").type(JsonFieldType.NUMBER).description("주문번호"),
                fieldWithPath("payAmount").type(JsonFieldType.NUMBER).description("금액"),
                fieldWithPath("pcUrl").type(JsonFieldType.STRING).description("PC URL")
        );

...

protected RequestSpecification spec;

@BeforeEach
void setUpRestdocs(RestDocumentationContextProvider restDocumentation) {
    this.spec = new RequestSpecBuilder()
            .setPort(port)
            .setConfig(RestAssuredConfig.config()
                    .encoderConfig(EncoderConfig.encoderConfig().defaultCharsetForContentType("UTF-8", ContentType.JSON))
                    .decoderConfig(DecoderConfig.decoderConfig().defaultCharsetForContentType("UTF-8", ContentType.JSON))
            )
            .addFilter(
                    documentationConfiguration(restDocumentation)
                            .operationPreprocessors()
                            .withRequestDefaults(prettyPrint())
                            .withResponseDefaults(prettyPrint())
            )
            .build();
}

ResourceSnippetDetails resourceSnippetParametersBuilder = new ResourceSnippetParametersBuilder();
ExtractableResponse<Response> response =
        given(this.spec)
                .filter(
                        RestAssuredRestDocumentationWrapper.document(
                                "결제요청 Identifier"
                                , resourceSnippetParametersBuilder
                                        .tag("결제요청")
                                        .summary("결제요청 summary")
                                        .description("카카오페이 결제 요청을 위한 API")
                                        .requestSchema(Schema.schema("PaymentRequest"))
                                        .responseSchema(Schema.schema("ApiResponse<PaymentResponse>"))
                                , REQUEST_FIELDS, RESPONSE_FIELDS) // 스니펫정의
                )
                .accept(MediaType.APPLICATION_JSON_VALUE)
                .contentType(MediaType.APPLICATION_JSON_VALUE)
                .body(req)
                .log().all()
                .when()
                .post("/intsvc/homepage/payment_kakaopay/v1/payment")
                .then()
                .log().all()
                .extract();
문서화의 핵심 코드는 .filter (…) 부분입니다. 이 부분에서 문서에 적힐 내용을 정의하는 것이기 때문입니다. tag, summary, description, requestSchema, responseSchema 에 API 에 대한 설명을 적으면 되고 REQUEST_FIELDS, RESPONSE_FIELDS 부분에 API 호출의 요청 및 응답 객체를 정의하면 됩니다.
spec 정의와 filter 부분을 제외하면 RestAssured 를 통한 api 테스트 코드와 동일한 형태입니다.
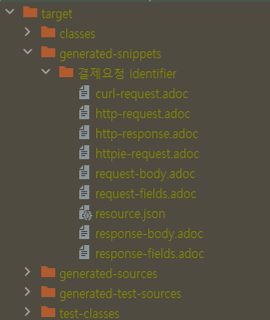
테스트를 실행하고 통과를 하면 target 디렉토리에 generated-snippets 에 api 문서 작성에 필요한 adoc 파일들이 생성됩니다.

플러그인 추가
Spring Rest Docs 를 이용해 문서를 만들때도 이러한 파일들이 생깁니다. 이제 OpenAPI Spec을 만들어주는 플로그인을 pom.xml 에 추가해줍니다.
<plugin>
    <groupId>io.github.berkleytechnologyservices</groupId>
    <artifactId>restdocs-spec-maven-plugin</artifactId>
    <version>${restdocs-spec.version}</version>
    <executions>
        <execution>
            <goals>
                <goal>generate</goal>
            </goals>
            <configuration>
                <specification>OPENAPI_V3</specification><!-- switch this to POSTMAN_COLLECTION for Postman Collection specs -->
                <format>JSON</format>
                <host>localhost:8080</host>
                <snippetsDirectory>${project.build.directory}/generated-snippets</snippetsDirectory>
                <outputDirectory>${project.build.directory}/classes/static/kakaopay/swagger-ui</outputDirectory>
            </configuration>
        </execution>
    </executions>
</plugin>
generated-snippet 디렉터리에 생성된 파일을 사용해서 <outputDirectory> 디렉터리에 OpenAPI 스펙의 JSON 파일을 만드는 설정입니다.이제 maven package 를 실행하면 문서화를 위한 json 파일이 만들어집니다.
그런데 저는 단순히 패키지를 실행하는 것 만으로는 문서화 작업이 잘 안됐습니다. 원인을 파악해보니 문서화를 위해 필요한 테스트 코드를 실행하지 않았기 때문입니다. 그래서 아래와 같이 플러그인을 하나 더 추가했습니다.
<plugin>
    <groupId>org.apache.maven.plugins</groupId>
    <artifactId>maven-surefire-plugin</artifactId>
    <version>2.22.0</version>
    <configuration>
        <encoding>UTF-8</encoding>
        <includes>
            <include>**/*Docs.*</include>
            <include>**/*Test.*</include>
        </includes>
    </configuration>
</plugin>
플러그인 추가 후 터미널창이나 IDE 의 maven package 를 실행하면 아래 사진과 같은 파일이 생성됩니다.

openapi-3.0.json 만들어졌습니다. 해당 파일을 열어보면 api 에 대한 정보가 적혀있습니다. OpenAPI Spec JSON 파일을 만들었으니 SwaggerUI 를 적용해 문서화를 하는 작업을 해봅시다.
UI 설정
Swagger 다운로드
- https://swagger.io/docs/open-source-tools/swagger-ui/usage/installation/ 접속
- 화면 하단에 Download the latest release 클릭
- 현재 최신 버전은 아래 링크를 통해 받으시면 됩니다
- https://github.com/swagger-api/swagger-ui/releases/tag/v4.18.2
- sourcecode.zip 다운로드 후 압축 해제
- 프로젝트의 resources 디렉터리 하위에 static 디렉터리를 만들고 dist 디렉터리를 통째로 복사
Swagger 설정 변경
복사가 끝나면 설정을 시작해봅시다.
1. /static/dist/index.html 의 이름을 /static/dist/pay-api-docs.html 로 변경해줍니다.
2. swagger-initializer.js에 있는 SwaggerUIBundle url 을 새롭게 생성된 openapi-3.0.json 파일의 경로로 바꿔줍니다.
url: "<http://localhost:8080/static/kakaopay/swagger-ui/openapi-3.0.json>"
정적 리소스 설정
정적 파일을 읽을 수 있게 설정을 해줍니다.
@Configuration
public class WebMvcConfig implements WebMvcConfigurer {
    @Override
    public void addResourceHandlers(ResourceHandlerRegistry registry) {
        registry.addResourceHandler("/static/**").addResourceLocations("classpath:/static/");
    }
}
결과
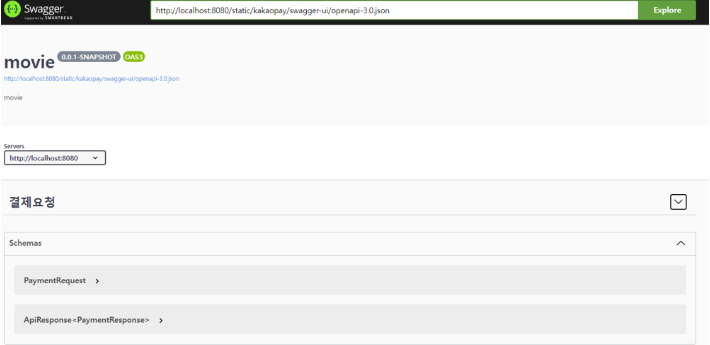
이제 모든 설정이 끝났습니다. maven package 를 실행하고 어플리케이션을 실행한다음에 문서를 호출해봅시다.

결제요청 드롭다운 버튼을 누르면

테스트 코드를 작성하며 입력했던 내용들이 화면 어디에 출력되는지 확인해 봅시다.
.tag("결제요청")
.summary("결제요청 summary")
.description("카카오페이 결제 요청을 위한 API")
.requestSchema(Schema.schema("PaymentRequest"))
.responseSchema(Schema.schema("ApiResponse<PaymentResponse>"))
OpenAPI Spec 을 사용해 Swagger UI 형식의 API 문서를 만드는 방법을 알아봤습니다.
참고
- https://github.com/BerkleyTechnologyServices/restdocs-spec
- https://github.com/BerkleyTechnologyServices/restdocs-spec-example
- https://swagger.io/docs/specification/about/
- https://github.com/ePages-de/restdocs-api-spec
- https://tech.kakaopay.com/post/openapi-documentation/
- https://yongc.tistory.com/18
- https://taetaetae.github.io/posts/a-combination-of-swagger-and-spring-restdocs/